Chapter 9. KVM Para-virtualized Drivers
Para-virtualized drivers are available for virtualized Windows guests running on KVM hosts. These para-virtualized drivers are included in the virtio package. The virtio package supports block (storage) devices and network interface controllers.
Para-virtualized drivers enhance the performance of fully virtualized guests. With the para-virtualized drivers guest I/O latency decreases and throughput increases to near bare-metal levels. It is recommended to use the para-virtualized drivers for fully virtualized guests running I/O heavy tasks and applications.
The KVM para-virtualized drivers are automatically loaded and installed on newer versions of Fedora. Those Fedora versions detect and install the drivers so additional installation steps are not required.
As with the KVM module, the virtio drivers are only available on hosts running newer versions of Fedora.
Note
There are only 28 PCI slots available for additional devices per guest. Every para-virtualized network or block device uses one slot. Each guest can use up to 28 additional devices made up of any combination of para-virtualized network, para-virtualized disk devices, or other PCI devices using VTd.
The following Microsoft Windows versions have supported KVM para-virtualized drivers:
Windows XP,
Windows Server 2003,
Windows Vista, and
Windows Server 2008.
9.1. Installing the KVM Windows para-virtualized drivers
This section covers the installation process for the KVM Windows para-virtualized drivers. The KVM para-virtualized drivers can be loaded during the Windows installation or installed after the guest is installed.
You can install the para-virtualized drivers on your guest by one of the following methods:
hosting the installation files on a network accessible to the guest,
using a virtualized CD-ROM device of the driver installation disk .iso file, or
using a virtualized floppy device to install the drivers during boot time (for Windows guests).
This guide describes installation from the para-virtualized installer disk as a virtualized CD-ROM device.
Download the drivers
The virtio-win package installs a CD-ROM image, virtio-win.iso, in the /usr/share/virtio-win/ directory.
Install the para-virtualized drivers
It is recommended to install the drivers on the guest before attaching or modifying a device to use the para-virtualized drivers.
For block devices storing root file systems or other block devices required for booting the guest, the drivers must be installed before the device is modified. If the drivers are not installed on the guest and the driver is set to the virtio driver the guest will not boot.
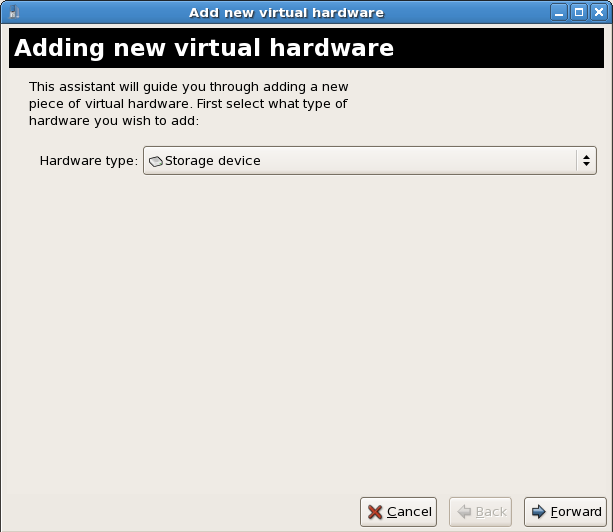
Procedure 9.1. Using virt-manager to mount a CD-ROM image for a Windows guest
Open virt-manager, select your virtualized guest from the list of virtual machines and press the Details button.
Click the Add button in the Details panel.
This opens a wizard for adding the new device. Select
Storage device from the drop down menu, then click
Forward.
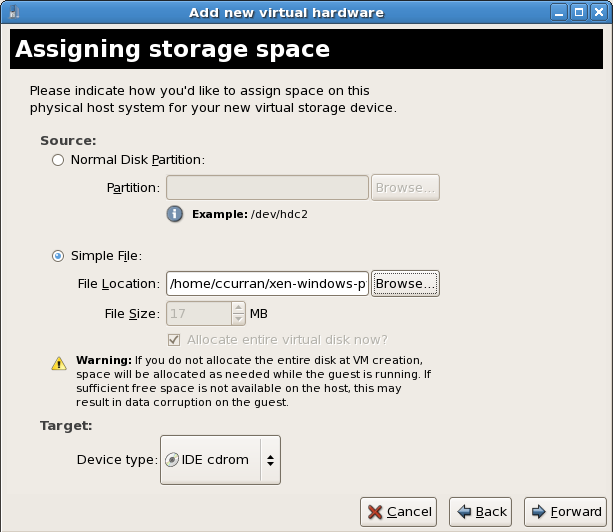
Choose the File (disk image) option and set the file location of the para-virtualized drivers .iso file. The location of the .iso files is /usr/share/xenpv-win if you used yum to install the para-virtualized driver packages.
If the drivers are stored physical CD, use the Normal Disk Partition option.
Set the
Device type to
IDE cdrom and click
Forward to proceed.
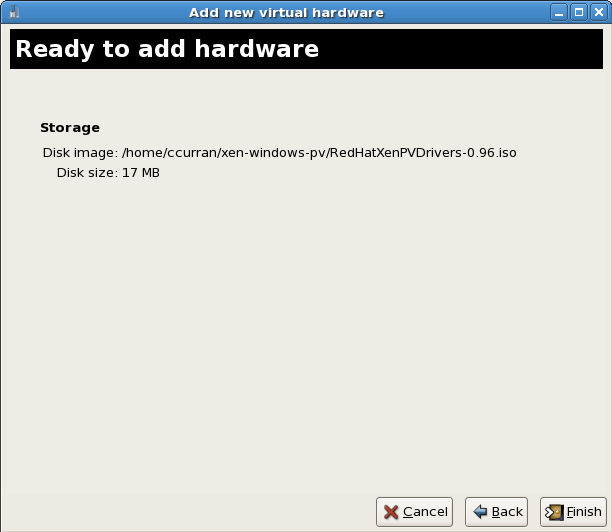
The disk has been assigned and is available for the guest once the guest is started. Click
Finish to close the wizard or back if you made a mistake.
This procedure covers installing the para-virtualized drivers during a Windows installation.
Below is a file-based block device using the virtualized IDE driver. This is a typical entry for a virtualized guest not using the para-virtualized drivers.
<disk type='file' device='disk'>
   <source file='/var/lib/libvirt/images/disk1.img'/>
   <target dev='hda' bus='ide'/>
</disk>
Change the entry to use the para-virtualized device by modifying the bus= entry to virtio.
<disk type='file' device='disk'>
   <source file='/var/lib/libvirt/images/disk1.img'/>
   <target dev='hda' bus='virtio'/>
</disk>
This procedure covers creating new devices using the KVM para-virtualized drivers with virt-manager.
Alternatively, the virsh attach-disk or virsh attach-interface commands can be used to attach devices using the para-virtualized drivers.
Install the drivers first
Ensure the drivers have been installed on the Windows guest before proceeding to install new devices. If the drivers are unavailable the device will not be recognized and will not work.
Open the virtualized guest by double clicking on the name of the guest in virt-manager.
Open the Hardware tab.
Press the Add Hardware button.
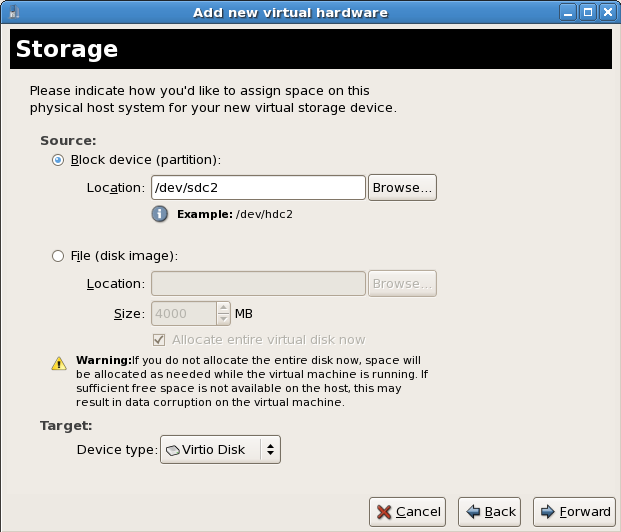
In the Adding Virtual Hardware tab select Storage or Network for the type of device.
New disk devices
Select the storage device or file based image. Select Virtio Disk as the Device type and press Forward.
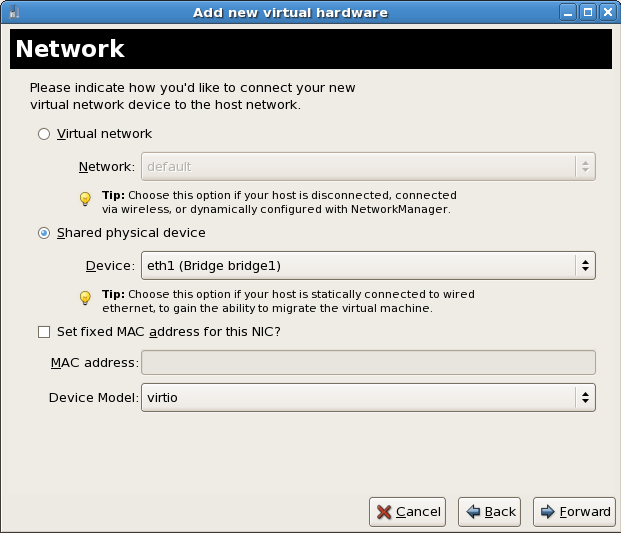
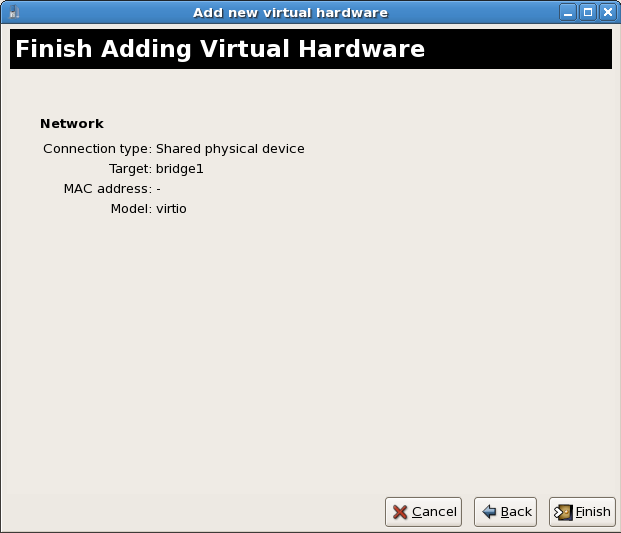
New network devices
Select Virtual network or Shared physical device. Select virtio as the Device type and press Forward.
Press Finish to save the device.
Reboot the guest. The device may to be recognized by the Windows guest until it restarts.